This post shows how to create a helloworld by using Spring boot and Camel from scratch. It covers following 2 examples:
1. Create a Camel route to pring a “hello world” message
2. Create a Camel route to move files from folder1 to folder2
Spring boot is an easy way to create an app. Its Dependency Injection makes it especially easy to create Camel Routes.
Following are the overall steps that we need to go through for this – we use Gradle to compile in this example.
1. Goto Spring Initializr to create a Spring project with Gradle, Java, Camel option.
2. Add Camel Main run controller setting property and test
3. Create a new HelloWorld Route for the printing of “hello world” message and test
4. Create a new route to move files from folder1 to folder2 and test
Following are the key steps related:
1. Create a Spring Project using Spring Initializr:
We go to the web site and select following options to create and press “Generate Project”.
The Spring Initializr will download the project with the Camel dependency for us as a Zip
Download the zip file and unzip it locally to your PC

2. We now add a Camel Main controller setting to file “HelloCamel\src\main\resources\application.properties”, this will keep the Camel Main thread running rather than exit immediately.
# camel main loop setup

camel.springboot.main-run-controller=true
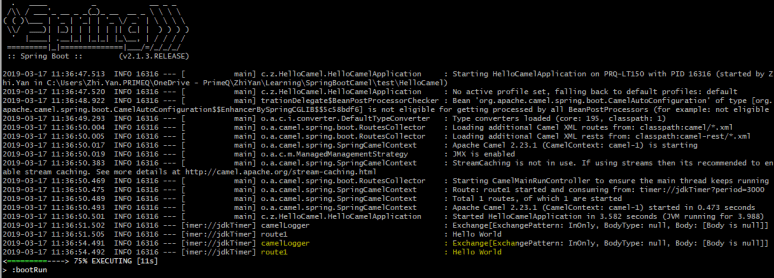
You can go to folder HelloWorld and try to run “gradle bootRun” after the setting, it should show following output, this means the camel started correctly – you can use “ctrl+c” to cancel the running afterward.

3. We now create a HelloWorld Route to print some hello world output. Add a new folder “route” under folder “HelloCamel\src\main\java\com\zzyan\HelloCamel”, and then add a new file “Route1_HelloWorld.java” inside it.
Please note the @Component command, this tells Spring Boot it’s a spring managed bean, spring will initialize it at run time.
Paste following codes to the file and try to run it with “gradle bootRun”
import org.apache.camel.builder.RouteBuilder;
import org.apache.camel.Processor;
import org.apache.camel.Exchange;
import org.springframework.stereotype.Component;
@Component
class Route1_HelloWorld extends RouteBuilder{
@Override
public void configure() throws Exception{
from("timer://jdkTimer?period=3000")
.to("log://camelLogger?level=INFO")
.log("Hello World");
}
}
It should show following info, the Hello World message is print out correctly
4. We try to add another route to the project, moves files from folder1 to folder2. Add a new file “Route2_FileTransfer.java” with following codes, PLEASE change the 2 folder names to your own.
package com.zzyan.HelloCamel.route;
import org.springframework.boot.SpringApplication;
import org.springframework.boot.autoconfigure.SpringBootApplication;
import org.apache.camel.builder.RouteBuilder;
import org.apache.camel.Processor;
import org.apache.camel.Exchange;
import org.springframework.stereotype.Component;
@Component
class Route2_FileTransfer extends RouteBuilder{
@Override
public void configure() throws Exception{
from("file:C:/camel_test1?noop=true").to("file:C:/camel_test2");
}
}
put a file in folder1, in my case it’s c:/camel_test1
run the project by “gradle bootRun”, and it should show both Routes are running.
it shows 2 routes are running now

check the folder2 folder in your own PC, it should copy all the files from folder1 to folder2:

If both tests work fine, congratulation, you have successfully used Spring boot and Camel to create 2 Routes.
You can continue to create more Routes with specific requirements – transform files, unmarshal csv etc, with the help of Camel, this would be straightforward.
You can also containerize the project to deploy it as a microservice to a cloud platform, which will be covered later in the blog.
