How to use WSO2 to expose DB table CRUD as Rest API

Rest API is every where now adays and it simplifies the integration between systems.

But when you only have a Relational Database, and you want to expose your DB CRUD operations to Rest API, most of the time, you will need to do some programming.

For small projects or companies that do not have enough resources, it would be hard to develop a program to do that.

Is there an easier way to do that?

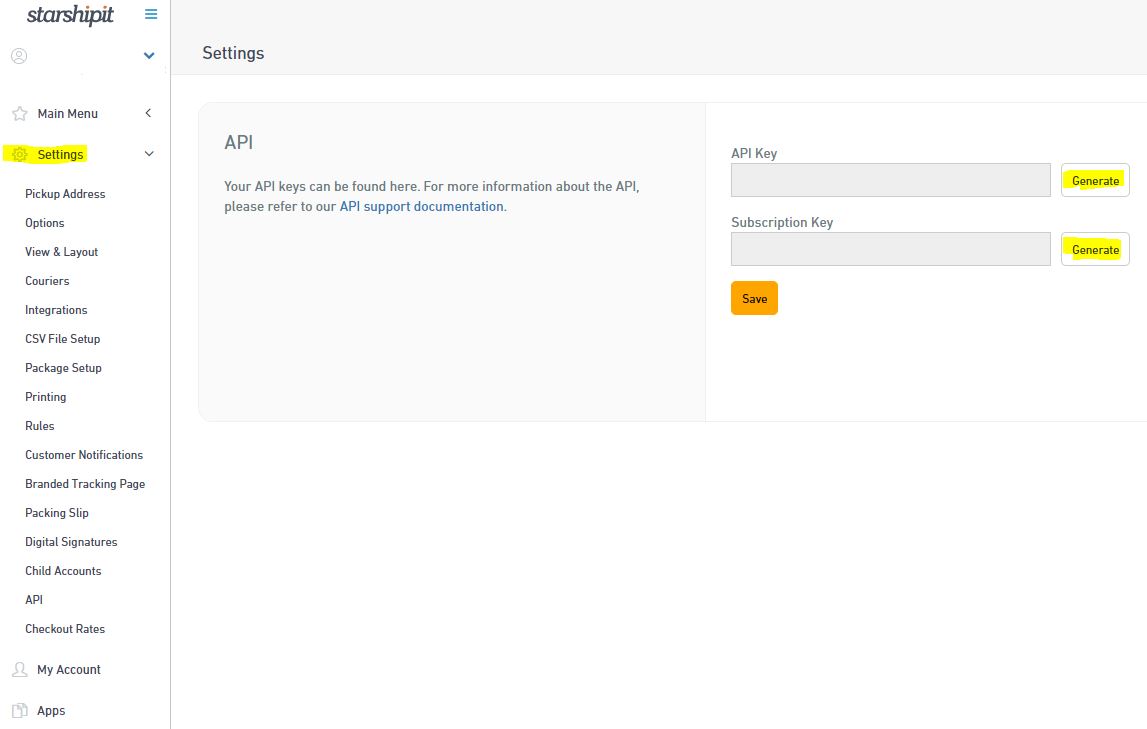
The answer is yes, this demos shows how to use WSO2 to do this, WSO2 is an open source platform, it has a web admin UI and a eclipse based integration studio tool.
The version I’m using is WSO2 6.6, you can download using the link.
Please also refer to the Integration Corner’s youtube channel with detail on how to use WSO2

After download, simply unzip the file, go to /bin folder and use integrator.bat or integrator.sh t start WSO2.
You should be able to visit https://localhost:9443/carbon using admin/admin

In this demo we uses Mysql to do the test.
Simply refer to most-popular-mysql-commands to get the sql we need in this demo

Following SQL are executed in the DB to create the test table and sample data
CREATE TABLE people(id INT PRIMARY KEY AUTO_INCREMENT,name VARCHAR(255),age INT);
INSERT INTO people (name, age) VALUES (‘John’, 24), (‘Jane’, 22);

Now we create a Data Service for this, we name it “PeopleDataService”

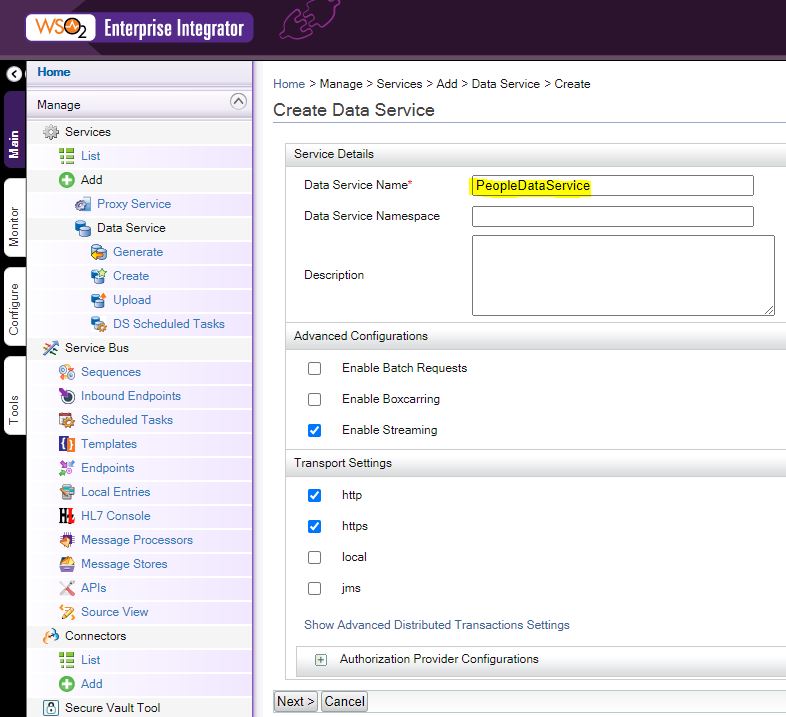
In the next step, setu a Data Source, in this demo, we used MySql, so we need to setup the MySql jdbc url
Please note you will need to put a MySql connector jar file in WSO2’s lib folder
The jar I used is “mysql-connector-java-8.0.23.jar”, you can find similar ones in MySql install or official website

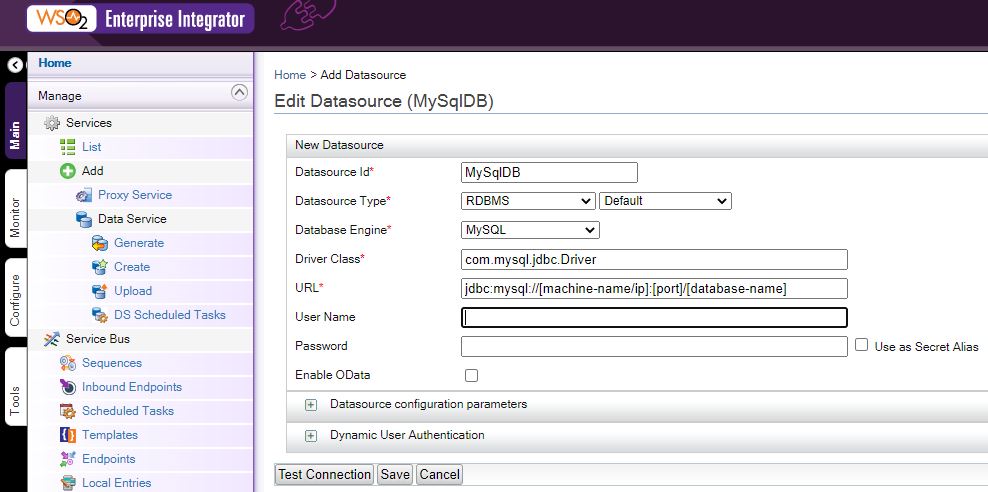
Get – Search Operation

Continue to setup the Query, you will need to also define the output to be a json, use column numbers and define the output mapping to the returned column number. $1 means the 1st column of the query output

Continue to the definition, we don’t need to define any operations in the DB, so we can ignore this.

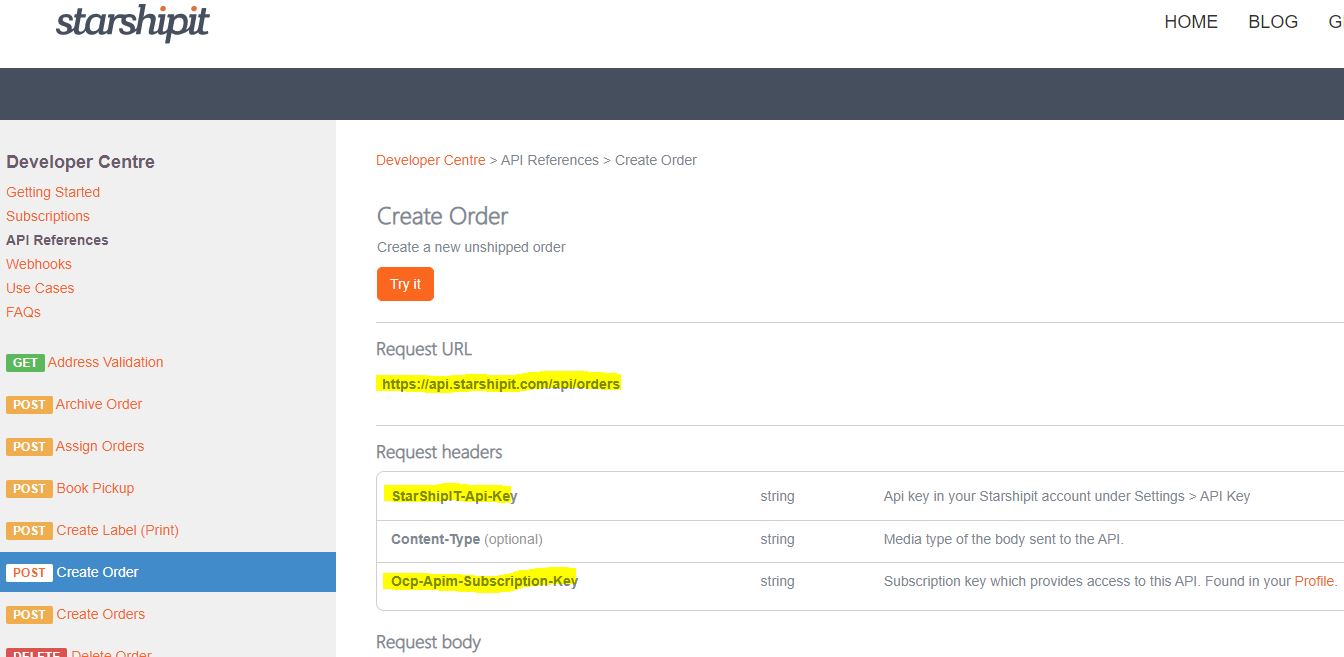
We define a Resources, this will be the WSO2 url that link to the DB query, here we will use people, and the Resource Method(or commonly called http verb) will be GET

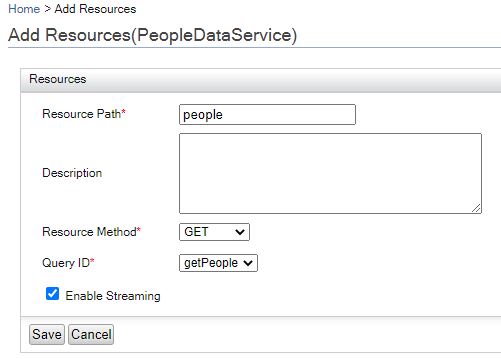
Save and finish the setup, now you should see a PeopleDataService in 1 min – refresh the page if you don’t see it

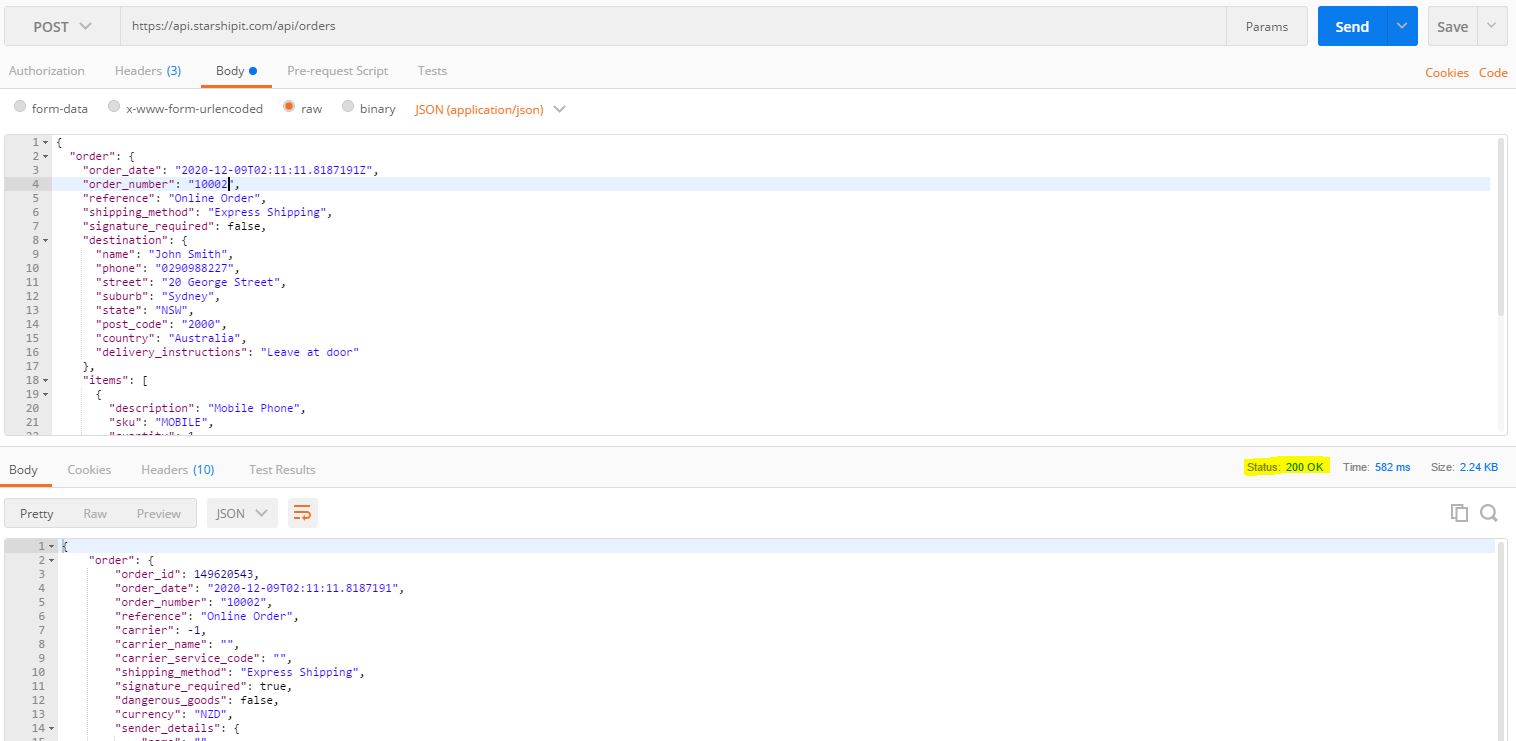
Now we can use PostMan to do a test on this Rest
You can find the end point definition on the Service Dashboard by clicking on the Data Service name

Use PostMan to do a Get operation test, and you should find it working as following

Post – Create Operation

Now we continue to create the Post/CREATE Restul API
We go inside the Service Dashboard and click the “Edit Data Service(Wizard)”, this will lead us back to the Data source definition wizard. We do not change the Data Source, but to create a new Query

Create the query as following
Please note, the parameters you passed in through Rest must have a leading ‘:’ char
After you create the query, click the “Generate Input Mappings”, it will create the Input Mappings for you
Also please change the type to INTEGER if it’s an INTEGER column in DB, as shown below

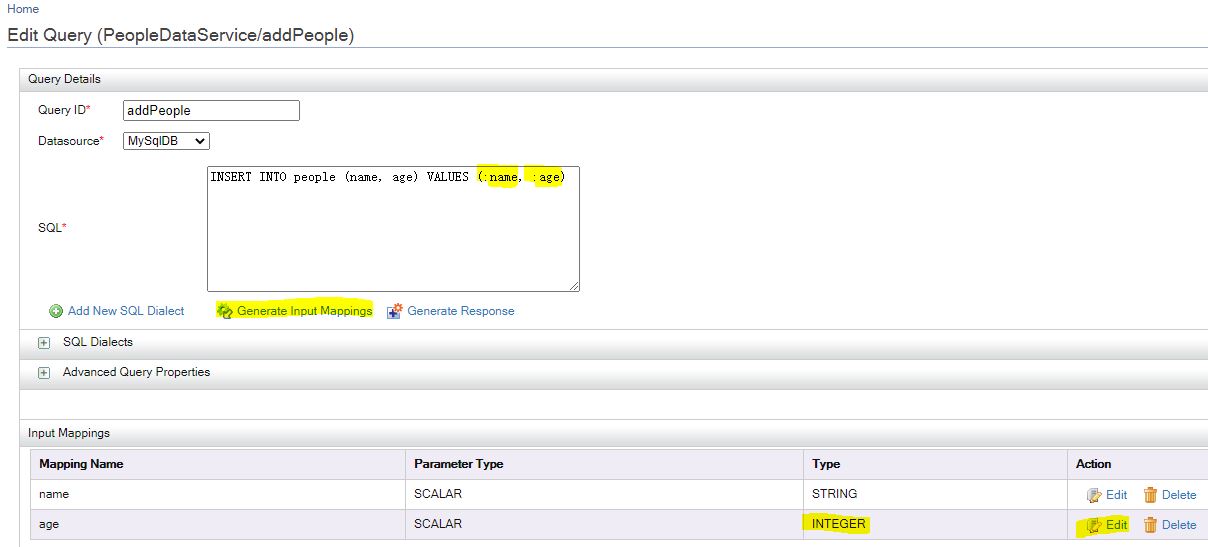
Save and continue to Add a resource to bind the Rest API to the new query

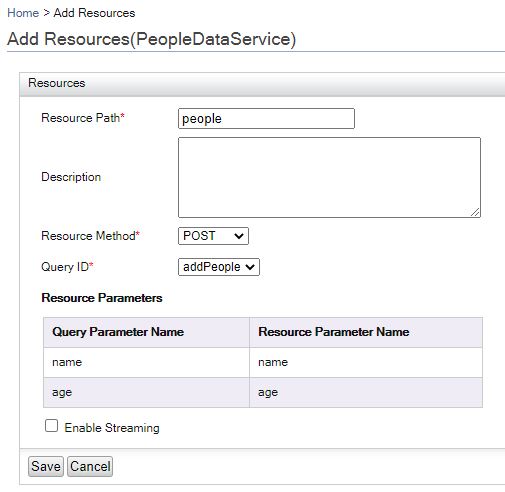
Now we can use PostMan to do the testing
For some reason, the post to insert into WSO2 is using following json payload

{"_postinscriptions": {
"name":"test",
"age":12
}
}

PostMan should show an 202 Accepted status, this means the query finished ok

Use the Get API to confirm the change, and you should see a new people is inserted
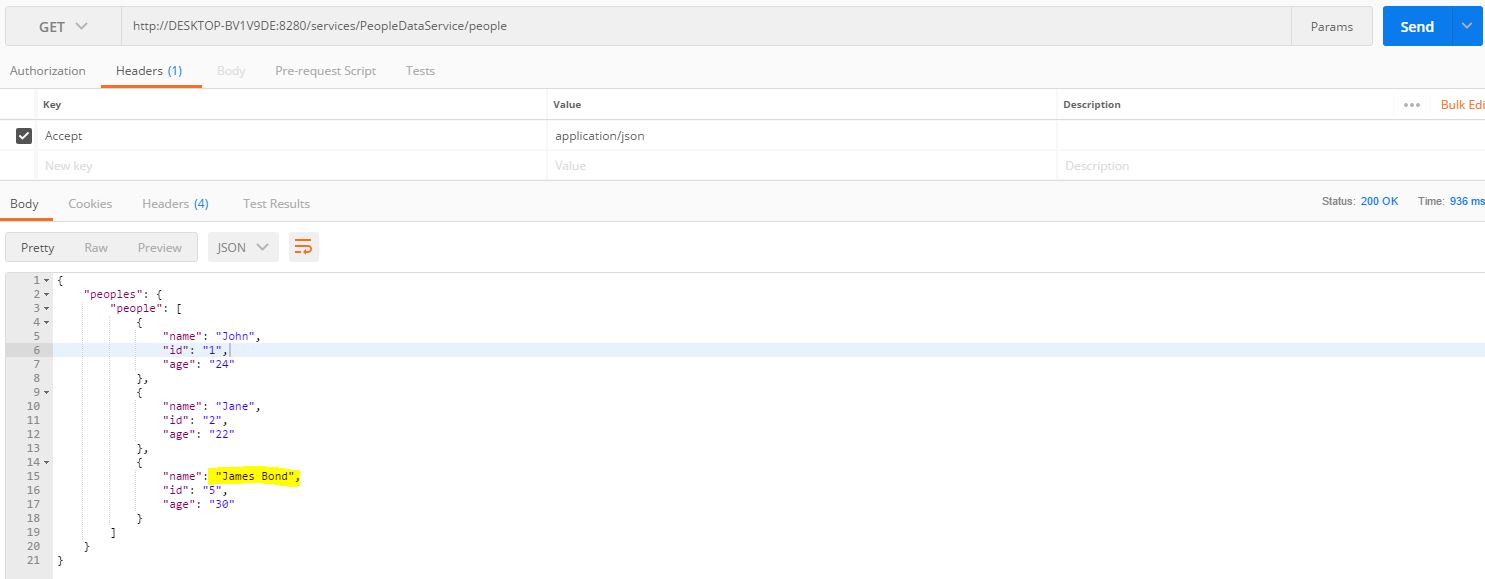
Update and Delete

Update and Delete will be similar to Create, just change the query and the Resource Method binding, and all bind to the same people resource

Following are the 2 queries for Update and Delete, please note you need to change the parameter to Integer
Update, uses PUT Method: update people set name=:name, age=:age where id=:id
Delete, uses DELETE Method: delete from people where id=:id

How to use starshipit API to create a Order?

Starshipit is commonly used by many businesses in NZ.
So I got a small requirement, I want to automatically create a label, how can I do that?

Well, Starshipit do have its integration APIs, so we can use it to create labels.
Let’s try it out. Following is the API url just incase you need.
https://www.starshipit.com/integrations

We need to create a developer account in the website
After verifying your email, you are all good to go.

To be able to test out the API, we need an Starshipit API key, to get this, we need an Starshipit account
https://developers.starshipit.com/api-key

Use following url to start setting up an Starshipit account
How to setup a Starshipit account

Now you should be able to get the API key required to access the API
Click the Generate button in StarshipIt setup, and you should get the API key
Url: https://app.starshipit.com/Members/Settings/Api2.aspx

Also you should get your developer key
Url: https://developers.starshipit.com/developer
Click the User profile on the right top of the header bar if you don’t see it

Ok, now you should have following keys ready and handy before doing the API testing based on the Startshipit settings page and the developer profile page
API Key, Subscription Key, Primary Key, Secondary Key

Go to Create Order page on the API Reference you should see following page relate with the API
It shows the API url, and what you should put on the Request Headers

Click the “Try It” button, you should be able to try out the Create Order

Fill in your key information that’s required.
StarShip T-api-key: this is the API Key you got earlier from the Settings page
Ocp-Apim-Subscription-Key: this is the primary key you got earlier from the developer profile page
Now try to click the “Send” button at the bottom of the page, it should receive a 200 feedback

This means the API connection and call out works fine.
Now we try to do the same thing using PostMan on our own laptop
Setup PostMan Post request and the header as following, Please enter your own API key and Primary key

Setup the Body as following, and click the “Send” button
If everything works fine, you should receive a “200 OK” response from the Starshipit server

Congratulations, you have successfully create an Order in Starshipit

So now you can continue to use the same API setup and the API Reference to do other API calls to Starshipit.

Enjoy!

How to use .net core to send email through gmail smtp?

Check your google account in following website
You will need to check the security setting and make sure you allow the login if it alerts
https://myaccount.google.com/u/1/

Enable the less secure apps setting inside google
This is required
https://myaccount.google.com/lesssecureapps

Go to DisplayUnlockCaptcha
This seems required, after this setting it’s able to send email, otherwise Gmail blocked the connection
https://accounts.google.com/b/0/DisplayUnlockCaptcha

Sign in using an app password
https://support.google.com/accounts/answer/185833

Refer to following url on how to use curl to send email to gmail – this some how failed in ubuntu
https://medium.com/digital-thai-valley/call-gmail-smtp-with-curl-b15a96dc722d

Following is the code that used to send the email

using System;
using System.Net;
using System.Net.Mail;

namespace SendEmailTest
{
    class Program
    {
        static void Main(string[] args)
        {
            Console.WriteLine("Begining to send an email now");
            var fromAddress = new MailAddress("fromemail@gmail.com", "From Name");
            var toAddress = new MailAddress("toemaili@gmail.com", "To Name");
            const string fromPassword = "PASSWORD";
            const string subject = "TEST";
            const string body = "TEST Email Body";

            var smtp = new SmtpClient
            {
                Host = "smtp.gmail.com",
                Port = 587,
                EnableSsl = true,
                DeliveryMethod = SmtpDeliveryMethod.Network,
                UseDefaultCredentials = false,
                Credentials = new NetworkCredential(fromAddress.Address, fromPassword)
            };

            using (var message = new MailMessage(fromAddress, toAddress)
            {
                Subject = subject,
                Body = body
            })
            {
                smtp.Send(message);
            }

            Console.WriteLine("Finished Email send");
        }
       
    }
}

How to install .net core, mysql, nginx using Oracle Always Free Ubuntu for .net core mvc apps

Following are the steps that consolidates multiple blogs on line, and to serve the purpose of installing .net Core and MySql using an Oracle Always Free Ubuntu – for testing.

1, How to Create-an-always-free-compute-vm-on-the-oracle-cloud
Please note,
a) When you choose the VM type, choose Ubuntu instead of Oracle Linux.
b) Download the ssh keys
c) Use and public IP when it asks, then you can use ssh to connect to the instance using Putty

2, How to Install MySql in Ubuntu
a) When create an normal user that can access from any IP(if you want), also grant privileges to the user
use CREATE USER ‘youruser’@’%’ IDENTIFIED BY ‘password’;
grant create, alter, drop, insert, update, delete, select, references, reload on *.* to ‘youruser’@’%’;

3, How to Install .net core on Linux
a) Since I’m using ubuntu, and ubuntu has apt, I referred to Install the .NET SDK or the .NET Runtime on Ubuntu
b) Please also note that the installation has different command for ubuntu versions, find the correct version you need

Test the installation – use following commands to create a test, it should output “Hello World!” on your screen
mkdir HelloWorld
cd HelloWorld
dotnet new console
dotnet run

Test the .net core mvc in Linux
Check This Blog out to know how to allow .net core mvc to have external access
mkdir HelloWorldMvc
cd HelloWorldMvc
dotnet new mvc
dotnet run –urls http://0.0.0.0:5000

Use curl to do a test to see if it returns the correct output
curl localhost:5000
It should show something like following:

4, Setup nginx and do a reverse proxy to visit the mvc project
For the setup of Nginx itself, I used the Ubuntu Tutorial Install and configure Nginx
sudo apt update
sudo apt install nginx
Use curl to test if it returns the nginx main page
curl localhost:80

———————————————————————
Install nginx failed, not able to connect through external network, not sure why, changed to use Apache instead

Seems the 80 port connection issue relates with Oracle Always Free VM setting mentioned in this blog
After running following 2 commands, I was able to connect to the 80 port
sudo iptables -I INPUT 6 -m state –state NEW -p tcp –dport 80 -j ACCEPT
sudo netfilter-persistent save

After the setup, Apache2 is on port 80, and Nginx is on port 8081
———————————————————————

5, Refer to Install and config Apache
6, Use the Microsoft tutorial Host ASP.NET Core on Linux with Nginx
After the reverse proxy configuration setup in Nginx, when visiting the 8081 port, it auto forward to the 5000 port which is the .net core mvc application as following